Transform Any Snare into a Concert-Ready Orchestral Snare Drum
- Nathan Coles
- Aug 11, 2025
- 6 min read
A step-by-step sound makeover for percussionists ready to level up
Ever wonder why your snare sounds out of place in orchestra rehearsal? It might not be your playing—it could be your drum. In this guide, we'll show you how to upgrade a basic snare into a refined orchestral snare drum. With insights from the shop floor to the concert stage, we’ll walk through component swaps, sonic considerations, and how to shape your sound with intention—not just gear.
Table of Contents
📬 Don’t miss a post. Sign up for the Black Swamp Newsletter for exclusive content, giveaways, and orchestral percussion tips straight from the source.
What Is an Orchestral Snare Drum?
While any two snare drums may look similar on the surface, their roles and expectations can be quite different. Let's take a drum set snare for instance. That snare is built for power and projection—it’s designed to cut through a band or mix, often favoring aggressive articulation with a sharp attack. In contrast, an orchestral snare drum is crafted for nuance. It needs to speak clearly at extremely soft volumes, respond immediately to delicate stick control, and blend seamlessly with acoustic instruments.
The differences go beyond how they’re played. Orchestral snares typically feature thinner, more responsive heads, cable or gut snares instead of curly wires, and are tuned higher to emphasize articulation and clarity. The shell material, bearing edges, and even hoop choices are all carefully selected to support a dry, focused tone with less overtone interference. In short: a drum set snare is built to be heard; an orchestral snare is built to fit.
Snare Drum Anatomy 101
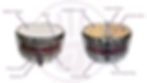
If you’ve got a standard band-room snare or budget kit drum, chances are it has these components:
Shell – The body of the drum. It shapes the overall tone, resonance, and character of the drum’s sound.
Drumheads – The top (batter) and bottom (resonant) heads vibrate to produce sound. Orchestral drums typically use thinner, more responsive heads for greater sensitivity.
Hoops – These hold the drumheads in place and affect tuning stability and tone. Triple-flanged hoops are more open sounding, while die-cast hoops focus the sound.
Tension Rods & Lugs – Used to tune the drum by tightening or loosening the drumheads. More lugs allow for finer tuning control.
Snare Wires – Thin cables, gut, or metal wires stretched across the bottom head. These vibrate sympathetically to create the drum’s signature “snap.”
Snare Strainer (and Throw-Off) – A mechanism that engages or disengages the snare wires. It allows players to switch between a crisp, buzzing sound and a dry, tom-like tone.
These components work together to make a snare drum—but with a few thoughtful upgrades, we can unlock serious concert hall potential.
Snare Drum Disassembly
Taking apart a snare drum might seem intimidating, but it’s a straightforward process when approached methodically—and it’s essential for regular maintenance, head changes, or deep cleaning.
Start with the snare wires. Disengage the throw-off (strainer) to release tension from the snares. If you’re planning to remove the bottom head, loosen or detach the snare wires from their straps or cords. Be careful to note how the wires are attached—you may want to take a quick reference photo before removing anything.
Next, remove the drumheads. Loosen the tension rods in a star pattern (like changing a car tire) to evenly release pressure on the head and avoid warping the hoop. Once all rods are removed, lift off the hoop and head. Repeat this process for the opposite side if you’re replacing both heads or inspecting the shell.
Inspect the shell and bearing edges. Check for dirt, damage, or irregularities that might affect the drum’s sound. Clean gently with a soft cloth—avoid harsh cleaners, especially on wood shells.
Hardware maintenance. While the drum is disassembled, it’s a great time to check the tension rods and lubricate them lightly if needed. Also ensure that the strainer and butt plate mechanisms are functioning smoothly and aren’t loose.
Disassembly is not just about fixing problems—it’s about getting to know your drum. Understanding how each part functions helps you care for it more confidently and diagnose issues faster when something sounds off.
Choosing the Right Concert Snare Components
With your drum ready for reassembly it's time to make some intentional upgrades to some of our components.
Component | Upgrade Suggestion | Why It Matters |
Batter Head | Crisp tone, soft feel, wide tuning range | |
Reso Head | Maximum sensitivity for snare wires | |
Snare Wires | Clear, dry articulation at all dynamics | |
Hoops | Focused sound, consistent tension | |
Muffling | Wooden dampeners, towels, gels | Controls ring for soft passages |
These choices are about sound, not price tags.
Rebuilding Your Snare, Step-by-Step
Reassembling your orchestral snare drum is an opportunity to fine-tune its sound, ensure optimal performance, and even experiment with head or snare combinations. Taking the time to rebuild it properly can elevate the drum’s response, articulation, and tone.
Clean your drum. Take this opportunity to clean the inside of your drum, the bearing edges, and anything else that's gathered dirt, dust, and drumstick shavings. Give yourself more reason to be proud of the instrument you're performing with.
Start with the bottom (resonant) head. Place the head on the shell, seat the hoop over it, and finger-tighten the tension rods. Then tighten using a star pattern, gradually bringing the head up to a medium-high tension. The bottom head is critical for how the snares respond—it should be tight but not choked. Tap near each lug to ensure even pitch between lugs and make minor adjustments as needed.
Orchestral snare drums can benefit from seating the bottom head. Follow our guide to make sure you've taken proper steps to seat your heads.
Reinstall the snare wires. Make sure your strainer throw-off is engaged during this step. Center the wires so they sit evenly across the bottom head and aren’t pulled off to one side. Secure them to the butt plate and strainer, using straps or cords depending on your drum’s design. With the wires attached, gently test the tension. Too tight and the drum will sound choked; too loose and the snares will rattle excessively or not respond properly. Aim for crisp articulation with no buzzing or lag.
Install the batter (top) head. Follow the same process: seat the head, align the hoop, and tighten in a star pattern. The top head controls the feel under the stick and affects tone and projection. Tune it to match the musical setting—higher for orchestral clarity, lower for warmth or soloistic playing. Again, use even tension and check for uniform pitch around the head.
Final adjustments. With both heads installed and the snares tensioned, play the drum and make adjustments based on sound and feel. You might need to tweak snare tension, re-seat the snares, or adjust head tuning slightly. Don’t rush this part—it’s where the drum comes to life.
Listen and respond. The ideal orchestral snare drum should sound crisp, articulate, and responsive at every dynamic. If it doesn’t, revisit your snare wire alignment, head tension, or check for any hardware that may have come loose.
Rebuilding is as much about refining as it is about reassembly. Once complete, your drum should feel balanced and confident—ready to respond to the lightest grace note or most powerful accent with precision.
Sound Test & Comparison
Listen to the video below to hear this drum before and after new components are installed.
The biggest sonic upgrade? Snare wires. Cable snares immediately shift the drum’s identity. Throw in proper heads and hoops, and it’s a whole new instrument.
Student Action Plan: Apply What You Learned
Want to upgrade your orchestral snare drum sound? Here's some tips to get the ball rolling:
Evaluate your drum: shell material, edges, number of lugs, etc.
Upgrade in stages:
Start with new heads
Add cable snares
Explore hoop and muffling options
Experiment with tuning: try different intervals and listening for response
Record yourself: compare your sound before and after
Play with intent: change the drum to serve the music, not the other way around
Final Thoughts: Musical Decisions Start Here
Upgrading your snare drum isn’t just about chasing a “better” sound—it’s about understanding the why behind the sound. The orchestral snare drum demands clarity, control, and the ability to blend. These aren’t things you buy out of the box; they come from thoughtful decisions and consistent listening.
So take the time. Listen critically. Try new things. And always ask: What does this piece of music need from me—and my drum?
📖 Want more guides like this? Sign up for the Black Swamp Newsletter and stay inspired.